Guide
How to Use a Compass: A Beginner's Step-by-Step Guide
Find north, measure a landmark's bearing and learn the basics of map orientation. Start with a short exercise somewhere familiar.
Updated October 25, 2026
Published by Online Compass · Accuracy and testing
To use a compass, first establish north, then measure or set the bearing you want to follow. On a baseplate compass, align the marked north end of the magnetic needle with the orienting arrow and follow the direction-of-travel arrow, not the needle.
Practice in a familiar open area before relying on these skills on a trip. A compass gives direction, not your location, terrain conditions or a safe route. For remote navigation, carry an appropriate map and backup equipment, and learn with a qualified instructor.
1. Identify the parts and prepare the compass
These steps use a typical baseplate hiking compass. If you have a lensatic compass or another design, consult its instructions.
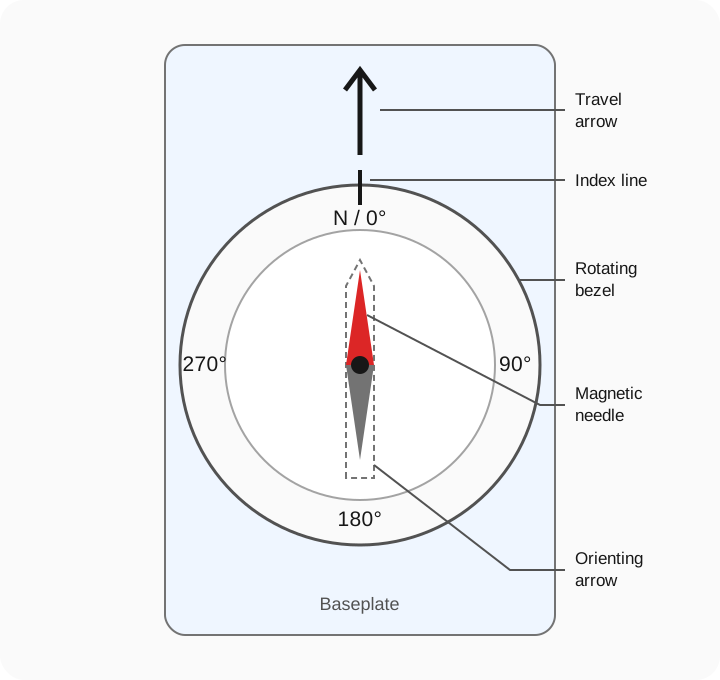
Hold the compass level, where you can see the needle without tilting the housing. Move away from vehicles, steel fences, magnetic accessories and electronics. Keep your phone away from a physical compass while measuring.
Identify the direction-of-travel arrow, the index line, the rotating bezel, the orienting arrow inside the housing and the marked north-seeking needle. If those names are unfamiliar, start with how to read a compass.
2. Find north
Let the needle settle. Its marked north-seeking end establishes magnetic north. Turn your body to face that direction if your immediate goal is simply to find north.
With north in front of you, east is to your right, south behind you and west to your left. These relationships change when you turn; east is not always on your right.
A compass needle does not usually identify geographic north exactly. For map work, check magnetic vs. true north before comparing references.
3. Take a bearing to a visible landmark
Taking a bearing means measuring the direction from your position to a subject.
- Choose a clearly identifiable landmark, such as a tree in a familiar open space.
- Point the baseplate’s travel arrow directly at it.
- Keep the baseplate still and turn the bezel until its orienting arrow aligns with the north-seeking needle.
- Read the degree value at the index line.
For example, if the index shows 60°, the landmark is between northeast (45°) and east (90°). Record both the landmark and your starting position if you want to repeat the exercise.
4. Follow a bearing you have set
Now suppose you want to face a magnetic bearing of 60° on an unadjusted compass.
- Turn the bezel until 60° is at the index line.
- Hold the compass level with the travel arrow pointing straight ahead of your body.
- Turn your whole body, not the bezel, until the north-seeking needle sits inside the orienting arrow.
- Look along the direction-of-travel arrow. That is the direction of the set bearing.
For practice, choose a nearby visible point along that line and walk toward it only where the ground is clear and safe. Stop before checking again rather than walking while staring down at the compass.
A bearing is not permission to cross an obstacle. If a route requires detours, a single heading is not enough to keep track of your position.
5. Orient a map with a compass
Orienting a map means turning it so that the directions on paper match the directions around you. Start by reading the map legend: grid north, true north and magnetic north may differ.
For a compass whose declination adjustment is correctly set to the map’s north reference:
- Set north or 0° at the compass index.
- Place a long edge along a north-south reference line on the map, with the travel arrow toward the map’s north.
- Keep the compass fixed on the map and turn both together until the north-seeking needle aligns with the corrected orienting reference.
- Check the terrain against the map before using it to plan movement.
For an unadjusted compass, apply the map’s current magnetic correction using the map and compass instructions. Do not simply line up a magnetic needle with a grid-north line and assume they are identical.
6. Take a bearing from a map
Mark a known starting point A and destination B on the map.
- Place the straight edge of the baseplate along the line from A to B, with the travel arrow pointing from A toward B.
- Without moving the baseplate, rotate the housing until its orienting lines are parallel with the map’s north-south reference lines. Housing north must point toward map north, not south.
- Read the bearing at the index line.
- Apply the required grid-to-magnetic or true-to-magnetic correction before following it on the ground, unless your compass is already adjusted for that reference.
There is no single declination number for every place, and a map’s printed correction may be old. Avoid applying the same correction twice. A local navigation course is a better place to learn full route planning than a short web tutorial.
Using a phone compass
For checking the direction you face, open the online compass on a compatible phone, tap Start compass and grant sensor access if requested. Hold the phone flat, point the top edge toward your subject and read the heading.
Check the north-reference label and move away from interference if the reading jumps. Location permission, when used for true-north correction, is different from permission to read orientation sensors.
If the tool says Manual exploration, the dial is not reading your real direction. A phone without a suitable sensor cannot become a live magnetic compass just by opening a web page. See accuracy and testing.
A five-minute practice exercise
In a familiar, unobstructed space, pick a landmark and write down its bearing from a marked starting spot. Turn away, set that number again and realign the needle. The travel arrow should point back toward the same landmark.
Repeat with a second landmark. If the readings disagree noticeably, check whether you moved the baseplate, reversed a needle end or stood near metal. Do not treat this repeatability exercise as a calibration certificate.
Next, use the directions and degrees chart to name each heading. For example, 90° is east and 225° is southwest.
References
- National Geographic: Compass covers compass construction, magnetic declination and deviation.
- Britannica: Compass explains north references and the instrument’s development.
- Use your own compass manufacturer’s manual and your map’s legend for model-specific operation and correction procedures.
Frequently asked questions
Can I use a compass without a map?
Yes. You can find magnetic north, identify directions and measure a bearing to a visible landmark. A compass alone does not identify your position or show whether a route is passable.
How do I use a compass to find north?
Hold a magnetic compass level and away from magnetic interference. Let the needle settle, identify its marked north-seeking end and turn yourself until you face that direction.
Should I follow the red needle?
The north-seeking needle normally indicates magnetic north, not your destination. To follow a set bearing on a baseplate compass, align the needle with the orienting arrow and follow the direction-of-travel arrow.